This is an issue I wanted to fix with a current project and whilst it’s a small issue, I find it useful to enter data into a field, hit ENTER, and expect to go to the next field in the tab order.
In this demo app, every time you update a JDBC parameter and hit TAB or ENTER, the JDBC URL automatically updates.
To do this you need to:
Handle the ENTER key being pressed
Move focus to the next control in the tab order
Set this behaviour for all relevant text controls
Step 1 is straightforward, but Step 2 is a bit messier. Tab order in JavaFX is controlled by the order controls are arranged inside their parent.
Steps 1 and 2 – Handle The Enter Key and Change Focus
I wanted to enable multiple controls to process the ENTER key, so I created an EventHandler for events.
This handler finds the index of the control handling the key press and requests focus from next control in parent’s list. A bit ugly, but it works.
/**
 * Force a focus lost event on enter key as well as tab
 */
class FocusHandler : EventHandler<KeyEvent> {
  override fun handle(e: KeyEvent?) {
    if (e?.code === KeyCode.ENTER) {
      val ctrl = e.source as Control

      // Tab order is determined by order of the children
      // inside the parent.
      // On hitting enter we shift focus to next child in order
      val kids = ctrl.parent.childrenUnmodifiable

      val nextFocus = kids.indexOf(ctrl) + 1
      if (nextFocus < kids.size) {
        kids[nextFocus].requestFocus()
      }
    }
  }
}
Step 3 – Enable ENTER Key Handling for Multiple Controls
We attach our FocusHandler to all relevant controls.
This post is about an alternative approach to building custom dialogs. The official approach is here. My approach is simpler and, I think, more flexible.
Custom dialogs are basically windows or scenes with multiple text entry fields, which are shown modally. Simple dialogs like alerts, messages could still use the JavaFX Dialog<R> approach linked to above.
Here is the single class required – CustomDialog<T> (and a DialogResult<T> to help things along…)
Simple Custom Dialogs. Your code is in white.
CustomDialog<T>
This abstract class has only has one function to override:
abstract fun result(): DialogResult<T>
Where T is the type of the value returned by the dialog. So your dialog implements this method so the dialog client can get a result, most often from the dialogs controller – which is not required by the Custom Dialog.
It also has a showAndWait method, which will show the dialog and return a DialogResult.
Usage
So if your custom dialog class is a subclass of CustomDialog<T>:
val dialog = YourCustomDialog(stage,"Your Label", "Dialog Title", "default value")
val result = dialog.showAndWait()
if (result.ok){
// do something withresult.data
}
Complete Example – SimpleValueDialog
This is a dialog which returns a single string value. I find it useful for getting user input for things like project names, object names, titles and so on. The code can be found here.
import javafx.fxml.FXMLLoader
import javafx.scene.Scene
import javafx.scene.layout.VBox
import javafx.stage.Stage

/**
 * Dialog for entering a single string value. Title, label and default parameters are all constructor arguments
 */
class SingleValueDialog(ownerStage: Stage, label: String, title: String, defaultValue: String?) : CustomDialog<String>(ownerStage, title) {

   var controller: SingleValueDialogController

   init {
      val loader = FXMLLoader(javaClass.getResource("/app5/singleValueDialog.fxml"))
      controller = SingleValueDialogController(label, defaultValue)
      loader.setController(controller)
      val root = loader.load<VBox>()
      stage.scene = Scene(root)
   }

   override fun result(): DialogResult<String> {
      val v = controller.getValue()
      if (v != null)
         return DialogResult(true, v)
      return DialogResult(false, null)
   }
}
That’s it.
The full code (including the SingleValueDialogController) is in app5 of this repo.
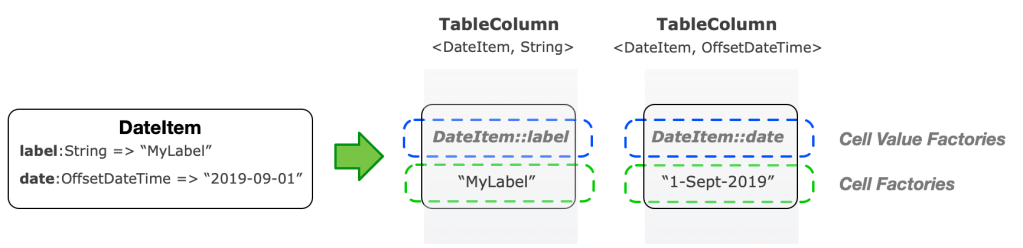
This post is about TableView factories, and the difference between Cell Factories and Cell Value Factories. There are a few good blog posts about this topic – I am just going to discuss the key concepts and the Kotlin version using Java 11.
CellValueFactories or CellFactories?
A cellValueFactory tells the column which values from the TableView contained type to display in the cells for each row.
A cellFactory tells the column how to display the data as a string.
Simple Object Scenario – Column Represents Object Property And Default toString() is Good Enough
Cell Value Factory Required – No
Cell Factory Required – No
Here, the column represents an object, but you are happy that its default string representation is what you want. So, no need for any factories – PropertyValueFactory is good enough.
Realistic Object Scenario – Column Represents a Complex Object
Cell Value Factory Required – Maybe
Cell Factory Required – Yes
The column maps to an object, but you need to specify which property to use, and you want to specify how the data appears on the screen. This may or may not require a cell value factory.
Dates are a common example – often you want to format dates in a specific way.
The code would look like this in the simpler scenario, without a cell value factory:
Table columns are pretty straightforward, once you understand how the factories work. There is a complete demo application demonstrating the scenarios discussed about here – see this on how to setup and run app4.
The Application menu all applications get from OS X
The Application Menu
This is a non-issue on Linux and Windows, as there is no application menu. You create your own “quit application” menu item in JavaFX to shutdown you application and that’s it.
Unfortunately, JavaFX has limited support for configuring or using the OS X application menu. So what can you do with the application menu on OS X?
Set the menu name (via tools like the javapackager tool)
Process some events and add handlers via Apple specific JDK packages (via com.apple.eawt package)
Use the JavaFX stage.setOnCloseRequest to handle the quit event
I will describe how to add a CloseRequest handler to application’s primary stage, as this took me the longest time to figure out how to do. This will enable you to shutdown your JavaFX Application when it has been installed as a real OS X Application. Once you know how, it’s dead simple. The only reason for this blog post is that it took me longer than expected to find this out. Maybe it was a bad day, or maybe I’m just an idiot. Either way, if I had some trouble getting to the bottom of it, no doubt someone else did as well.
In my flimsy defence, I had only done something similar in Swing before, and a search on StackOverflow resulted in questions related to, but not exactly answering the question.
Here is the logic for your main application class. That’s it. Embarrassing really.
 override fun start(stage: Stage) {
 ...
  stage.setOnCloseRequest {
    shutdown()
  }
  ...
}

fun shutdown() {
  // your additional shutdown logic
  Platform.exit()
}
JavaFX appears to know which operating system is running and automatically uses the system menu bar if possible (unlike Swing). So, no need for code like this anymore:
I took a look at a few other OS X applications, and confirmed they only had a Quit Application menu item in the application menu, and nowhere else. I spend so much time hitting the ⌘-Q key (a habit learned way back in 1985), I never pay much attention to the quit menu items.
So, if you have a ‘Quit’ menu item in you JavaFX menu (expected for operating systems other than OS X), don’t show it on OS X – you only need it for Windows and Linux versions.
I started this blog after spending several years of my private time building Kotlin and JavaFX desktop applications for fun and very little profit. My day job has nothing to do with either. Along the way, I have picked up hard-won experience with Kotlin and JavaFX. I often struggled with getting answers for my issues, and having collected lots of private repos in bitbucket, thought… “Why not blog about my experiences?”
Nothing sharpens your skills like creating demos and explaining things, if only to avoid writing something stupid.
Anyway, enough crap about me. On with the show.
I plan to blog about issues that I came across developing Kotlin desktop applications such as Drag and Drop, Custom Controls, Multiple Controllers and so on. Each post will discuss a specific, working application on GitHub.
This first post is mostly about showing how to get started with a basic Kotlin/JavaFX/Gradle setup.
I have created a GitHub repo with fully working example:
<edit build.gradle. Update JFX_INSTALL to point to JFX 12>
gradlew clean build
gradlew runApp1
JavaFX is now a Separate Library
Duh. It’s 2019 and all of us with more than 30 seconds of Googling behind us will know this. JavaFX is now OpenFX and its downloaded as a plain old zip file. So you can install it anywhere. This has implications for your gradle config.
My build.gradle repositories block looks like this now.
A variable called JFX_INSTALL now defines where it’s installed. This will come in handy later. The install contains a lib directory with all the jars you need.
I don’t know if this is the best way to do it, but it satisfies rule 1 – Keeping Things Simple.
Given that as of today, we have Java 11 and 12, with OpenJFX 11 and 12, what are the allowed permutations? Well I know that:
Java 11 + OpenJFX 11 ==> Works
Java 11 + OpenJFX 12 ==> Works
Java 12 + OpenJFX 12 ==> Works
Java 12 + OpenJFX 11 ==> Not sure ++
++ The OpenJFX website tells you to use Java 11 and that’s about it. I quote:
If you have newer or older versions of Java installed along with JDK 11, you need to make sure that the JAVA_HOME environment variable points to JDK 11
Some basic tests with Java 11 and switching between OpenJFX 11 and 12 has shown zero difference in behaviour so far.
Gradle Oddities
The dependencies section references the OpenJFX install location rather than the Maven repository details. That’s because the Maven artefact JFX jars are all empty. WTF? No obvious reason after some research. I ploughed on, and did this:
Inelegant, but I am nothing if not goal oriented. Stints as a pre-sales consultant really drilled that into me.
I suspect that this may be due to the use of Java Modules, which I have zero experience with. No one at my day job has ever used them either. So I will blithely coast over this and worry about it ‘real soon now’.
Running The Application
Since we need to use modules, starting an OpenJFX 11+ app requires some extra VM parameters, basically telling the JVM where you installed OpenJFX and which modules you require loaded. Weird. Why can’t this be worked out some other way? Surely as part of the compile/link/resolve dependencies process?
Below is the gradle task for running App1. Hopefully the first of many.
Well that’s it for the first post. Nothing revolutionary here, but hopefully the code repository works out of the box. If you cannot get the demo running, let me know so I can fix the bastard.