Installmation – An Installer Generator for Java 11+ Apps

GitHub Repo

In a burst of enthusiasm, I spent the last few weeks creating a GUI frontend to the jpackage utility, slated for the upcoming JDK 14 release. I called the tool Installmation, a portmanteau of ‘installation’ and ‘automation’. It’s written in Kotlin and JavaFX, of course, and focuses on creating JavaFX application installers, but can create non-JFX applications.

Generally, you would script the creation of installer creation into your build process, but there are occasions when a simple UI tool is faster. No more remembering the arcane and fiddly parameters, cutting and pasting stuff between projects, and so on. Plus, it can generate batch files for you as well.

I suppose the ultimate test for an installer tool to create its own installer, sort of like how bacteria reproduce – binary fission. So, Installmation passed the binary fission test a few days ago – the installer is available here.

The tool has four capabilities:

  1. Create application images
  2. Create complete installers
  3. Generate standalone shell scripts to create images and installers
  4. List the module dependencies of an application

In this post, I will focus on creating complete installers. I will use it to create an OS X installer for one of my own repos. Generating scripts and module dependencies will be covered in another post, to keep this post mercifully brief.

Setup

Sadly, there is some stuff you will need to download and install first, but hey…cross-platform development has a long and rich history of being a pain in the ass. The suffering continues.

OS X Catalina Headaches

If you are running on OS X Catalina, most of the JDK 14 command line tools will not run due to Apple’s new GateKeeper security ‘feature’. I disabled mine with:

sudo spctl --master-disable

Which makes it behave like older OS X versions and allows all executables to run. This disables Gatekeeper, so use at your own risk. Here is some detail on it.

You will then have to double click on each of the following in Mac’s Finder to remove the warning from each executable (F%^&#$&!!):

  • jpackage
  • jdeps
  • jlink

This issue will go away when JDK 14 is officially released (March 2020) and the installer is properly signed by a verified Apple Developer Certificate. 

Prepare the Target Application

The installer will require a few details about the application to be installed:

  • A main class
  • An application jar file
  • Classpath items

The installer will do the rest, in terms of building a custom runtime by analysing your applications module dependencies.

I will use my own javafx-app-1 repo for this tutorial.

For the purposes of this post, I have added gradle tasks to the javafx-app-1 repo to makes things easier.

From inside javafx-app-1 repo directory, run the following gradle tasks from the command line:

    gradlew jar
    gradlew libs

This will create the application jar in the build/libs/ directory, and a build/deplibs/ directory with all the dependencies. This is just for the purposes of this post.

Start the Application

You can either start the app after cloning the repo with gradlew runApp or download the binary from  here.

It looks like this.

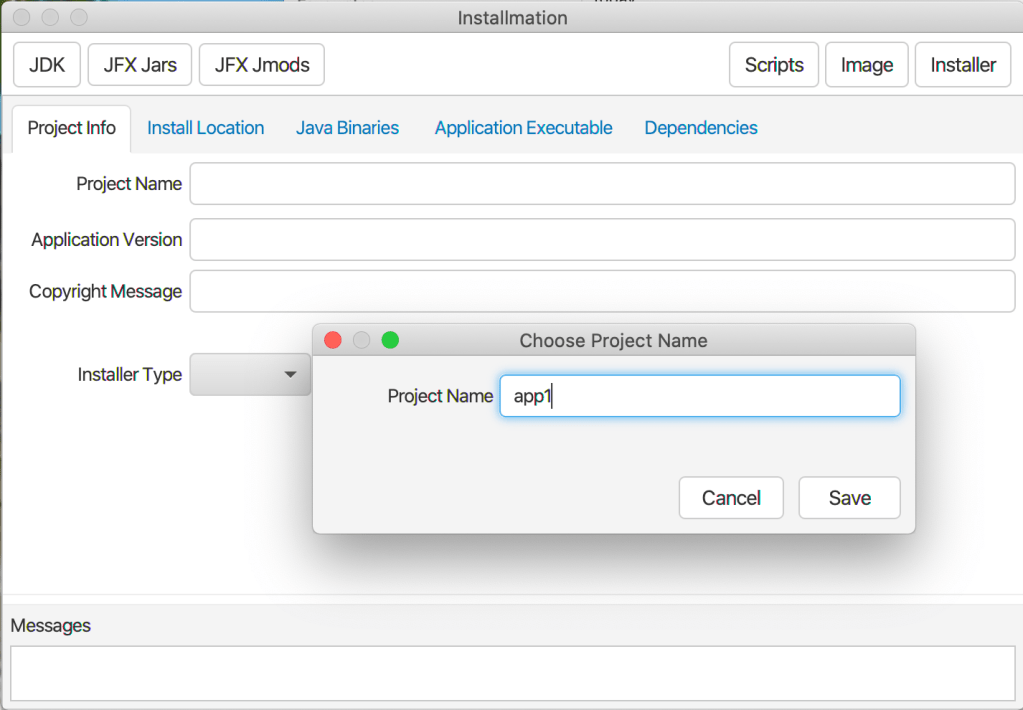
Create A New Project – app1

Create a new project and save it. All files are saved in the <user.home>/.installmation directory. Fill in the project name,  and set the installer type to pkg. The other fields are optional and will default to sensible values.

Setup Install Directories

These 3 directories can be anywhere, but are populated during installer generation, and are recreated for every generation attempt.

Input Directory – Installmation copies all your project files to a single location, in a format easy for jpackage to process.

Image Build Directory – Location where jpackage will generate the packaged application. On OSX, this is an .app file, on Windows, multiple files and directories. You should be able to run this application out of the directory. This is a good smoke test to ensure everything works.

Installer Directory – Location where installer will be generated – .msi, .exe, .dmg, or .pkg files.
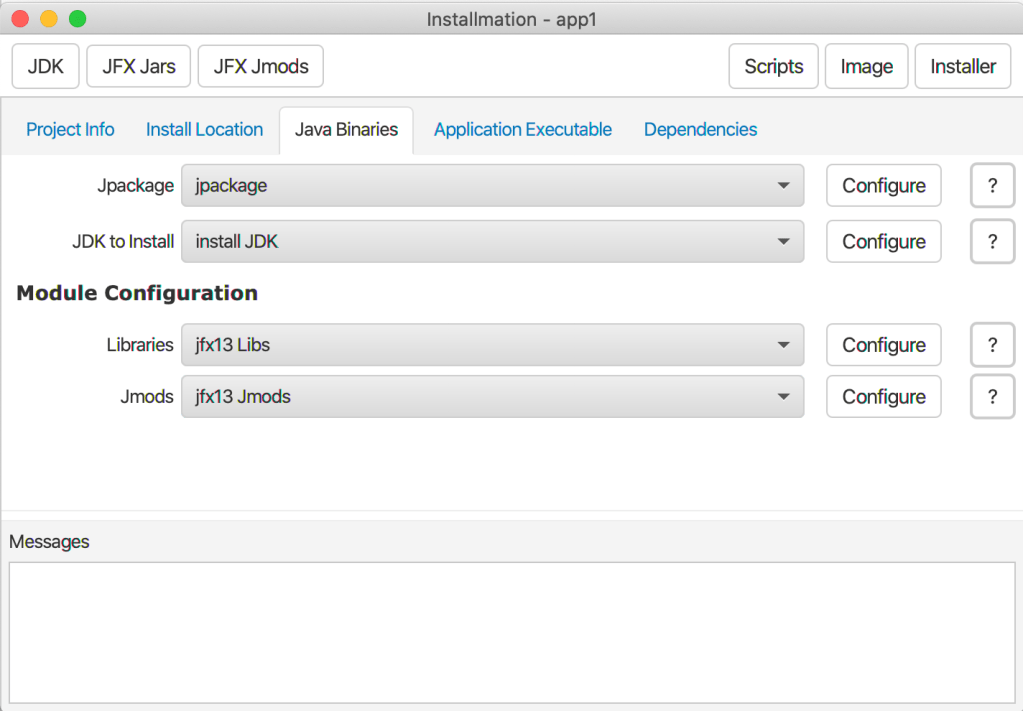
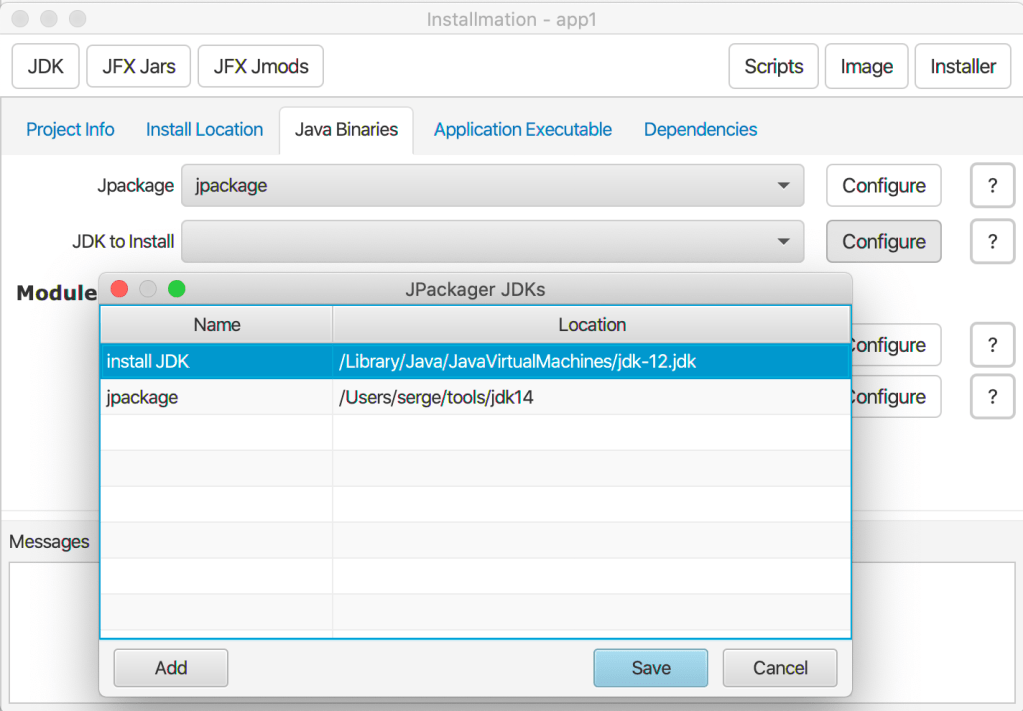
Setup Java Binaries

This dialog is more complicated than you would expect. Until JDK 14 is released and used everywhere, you will need to manage jpackage JDKs separately from your deployment JDK. Similarly,  JavaFX 11+ is not a single install, but split into the libraries and mods downloads.

Jpackage – JDK which contains jpackage. This will be version 14 or better – the EA release (as of December 2019) works fine.

JDK to install – This is the JDK which will be customised into a runtime and added to your build image. This can be be any version (11+ for JavaFX, however).

LibrariesOptional. JavaFX libraries download. This is required only if you have Java 9 modules you need to add.

JmodsOptional. Only used for JavaFX applications.

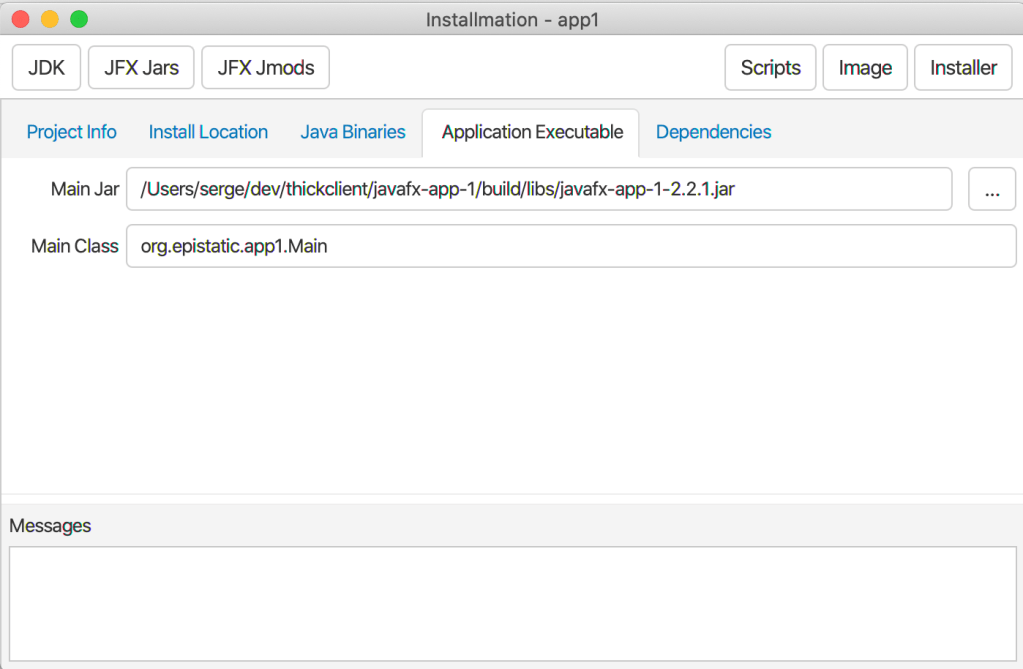
Setup Application Jar File and Main Class

This panel is straightforward – just set the full path of the main jar file and the main class name.
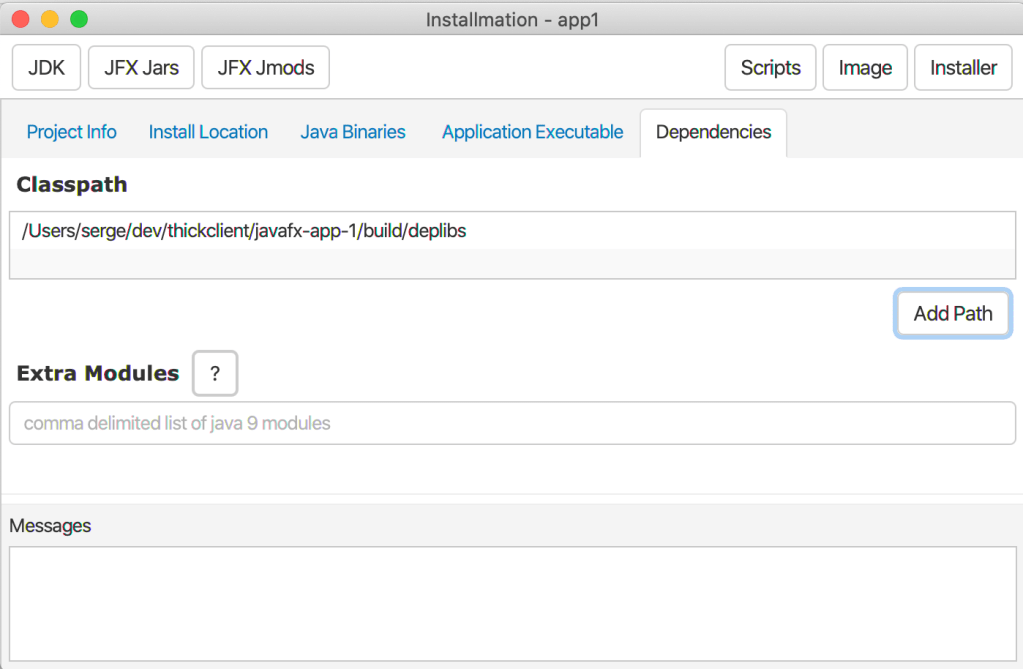
Setup Classpath

Add all you class path elements. The extra modules is optional and a bit experimental right now.

Generate the Installer

Save the project and hit the installer button and if everything went well, you should see the successful creation of an installer. It is created in the installer directory specified above.

Final Comments

The tool is pretty basic at this stage.  It needs a lot more testing, and has a strong JavaFX bias. A lot of installer tools don’t support JavaFX directly so I made a concerted effort to do so. I made efforts to make the interface as intuitive as possible, but I am sure it could be improved, so any feedback would be great – just create issues in GitHub. 

Some of things I will work on in the short term include:

  • Splash screens and icons
  • Custom configuration file deployment

Building a Windows Installer for a JavaFX application

GitHub

After finishing the development of my current project, I started on the final task – building the installers. The Mac process was relatively painless but the Windows process was another story altogether. I came up with a workable solution, after a lot of trial and error, aided by some good blog posts here and here.

Caveat: This approach relies on Exe4j – a commercial product, but you can work with the free demo version. A standard license is 69 USD, and no, I don’t work there.

The Goal

Create an Windows 8+ installer for my JavaFX demo app 3 with:

  • an embedded JDK11+ custom runtime (and therefore using Java 9 modules)
  • Ability to package non-modular java applications
  • An executable that behaves like a Windows application
  • the usual installation features
  • No expensive installer tool licenses
  • Uninstall capability

The Process At a Glance

Below is the process for Windows and Mac. I will talk about the Windows process in this post. For the Mac process shown below, the java packager used is a backport provided by Gluon that works with JDK 11 onwards.

I will discuss the Windows process split into 5 steps:

  1. Define the installation directory
  2. Build the jar and add dependencies
  3. Create the install image
  4. Create the executable
  5. Create the installer

Setup

Step 1 – Define the installation directory

Nothing needs to be done here, just a description of the planned install directory for the installation process:

When the install image is ready, (installBuild directory) it will look like this:

  • lib/ – All the jars are placed here
  • jre/- The custom java runtime
  • javafx-app-1-1.0.0.jar – application jar file
  • JavaFxApp1.exe – executable

After installation on another machine, the install will also have this structure.

This will be created in the root of javafx-app-1 repository in the installBuild directory.

Step 2 – Build the jar and add dependencies

This stage uses gradlew tasks to build and package the entire repo (applications 1,2 and 3) which is cheating a bit, but simplifies the explanation. We will only start app3 in the final install executable.

So, run the following tasks in javafx-app-1 project root directory. They are nothing special:

gradlew jar
gradlew collateInstall

This will result in the following directory structure:

I prefer having the application jar file sitting on its own, rather than with the other jar files.

Step 3 – Create the Install Image

We now need to add the embedded custom java runtime to the installBuild directory. After this stage is completed, the installBuild directory should have everything required to start the application.

Step 3a – Find Modules Dependencies

We need to get a list of java 9 modules that the application and it’s dependencies use. This can be done with the JDK jdeps utility. I have wrapped this in the gradle task called listModules. When you run this task the output is a bit messy, and you need to ‘pick out’ the modules from the list

When you run:

gradlew listModules

You will get output as shown below (red highlights are mine). The highlighted modules will be needed for the next step. Since this is a dependency graph, you just traverse each entry from left to right until you hit a JDK module not on your mental list. Tag it red and continue. At the end add all the red modules to the dependencies.txt file. Since my app is a non-modular one, I suspect that is why the output is not a single, tidy list of modules.

Step 3b – Update dependencies.txt

The file dependencies.txt in the repo root directory contains a list of dependencies. It is used as input to the next step. I put it in a file for simplicity, as parsing the jdeps output is a manual process for now.

So I added all the red modules (excluding java.base as that is an implied dependency of all modules) from previous step into dependencies.txt – you don’t need to. It is a single line of text:

java.xml,java.desktop,java.scripting,java.logging,javafx.base,javafx.graphics,javafx.controls,javafx.fxml

Step 3c – Generate the Custom Java Runtime

To generate a custom java runtime, we use the JDK jlink tool. It requires a list of modules your application requires and can even generate a launcher script. I have wrapped the jlink call into the buildRuntime task. This task puts the runtime into the installBuild/jre directory.

run it from the git repository root directory:

gradlew buildRuntime

After it’s done, that’s it – nothing more to do, other than to test it. You need to make sure you did not miss any modules.

The installBuild directory should now look like this:

Step 3d – Test Install Image

At this stage, the installBuild directory should have every thing required to run the application – completely standalone and at 45MB, a lot smaller than the full JDK.

Create a script like the following Windows batch command in the repository root directory:

installBuild\jre\bin\java.exe -cp installBuild/javafx-app-1-1.0.0.jar;installBuild/lib/* org.epistatic.app3.Main

when you run this script, it should start the application.

app3 running on Windows 10

Step 4 – Create the Executable

Now that the application is ready, we want to create a proper Windows executable. There are several ways of doing this:

  • Tools like launch4j, exe4j
  • Java Packager (Windows backport for JDK 11 here)
  • Write your own Java Launcher (an ancient, but useful article here)

After some experimentation, I chose Exe4j because it was inexpensive, and supported Java 9 modules. Java packager worked but was hard to configure (on Windows only – the Mac version works well) and the generated runtime and directory structure was messy, IMHO. I may try again with Java packager on Windows in the near future – maybe I missed something. Writing your own Java Launcher was only a consideration before I discovered Exe4j (distinct from the considerably more expensive Install4j), and found some old C code that looked like a feasible starting point.

I have created an Exe4j configuration file which you open with Exe4J and then generate the executable. It’s pretty easy and I got it working after only a small amount of trial and error. The key issue is to make all the paths relative to the exe4j file, making it portable.

Once you generate the executable (Step 9 in the Exe4J tool), your installBuild directory should now look like this:

Step 5 – Create the installer

The final step is to now create the installer. This will be done using Innosetup, a free windows tool for creator. Innosetup was the third or fourth installer tool I have used over the years and I found it wonderfully easy to use. I finished the installation in about an hour, which is astounding for a newbie. I take no credit for brilliance – all kudos goes to the tool. I was so impressed I donated some money to the project two minutes after I finished.

The Innosetup script is very brief:

Creating the installer was very simple in Innosetup. Click the generate button and it’s done. The installer is created in the installers directory.

And that’s it. All done.

More to Do

Innosetup supports the Windows signtool, which is necessary to sign your application with Microsoft certificates, proving your application comes from a valid software vendor (similar to the signing process with Apple’s Developer program). The installer above does not have this setup.

Also, the application we have packaged does not have any configuration, but any real application most likely will have. This would need to be installed, preserved between upgrades, and should be removable as well.

Finally, the process of upgrading older software versions may need to be handled differently, as the installer above overwrites any previous install.